

Hailstorms don’t just pass through. They hit hard, leave fast, and often hide the real damage behind what looks like “just a few dents.” That’s exactly why understanding how to document hail damage for an insurance claim is so important. One missed detail can cost you thousands. One weak photo can reduce your payout. One delay can raise doubts you don’t want to deal with.
I’ve seen homeowners do everything right except document properly. And that one gap? It changes everything. This guide is built for homeowners in Houston and beyond, right at the moment before you file. Before you hire anyone. Before the insurance company gets involved. If you’re researching how to document hail damage for an insurance claim, this is where you get it right from the start.
Why Proper Documentation Makes or Breaks Your Claim
Insurance companies don’t pay based on what “probably happened.” They pay based on what you can prove. Clear. Organized. Time-linked proof. That’s the entire game. When you fully understand how to document hail damage for an insurance claim, you stop hoping your damage is recognized you start making it undeniable.
Here’s what strong documentation does:
- Connects damage directly to a specific storm
- Shows severity, not just presence
- Eliminates ambiguity
- Speeds up claim processing
And here’s what weak documentation leads to:
- Partial approvals
- Missing line items in estimates
- Delays and re-inspections
- Lowball offers
Even something as subtle as parallax the way objects appear different from different angles—can influence how damage looks in your photos. One angle might hide a dent. Another reveals it clearly. To better understand how viewing angles affect perception in images, you can explore this concept further. That’s why documentation isn’t just about taking pictures. It’s about taking the right pictures.
When to Start Documenting Hail Damage
Immediately after the storm passes and only when it’s safe. Timing matters more than most people think.
Insurance companies rely heavily on storm data. They cross-reference your claim with:
- Reported hail events
- Radar data
- Local weather records
If your documentation starts days later, questions start forming.
Was the damage already there?
Did something else cause it?
Is this normal wear?
You don’t want those questions. If you’re serious about mastering how to document hail damage for an insurance claim, act fast. Capture the evidence while it’s fresh, visible, and clearly tied to the storm. In storm-prone areas like Houston, where hail events can hit hard and fast, documenting immediately becomes even more critical.
Step-by-Step — How to Document Hail Damage for an Insurance Claim
Let’s break this down into a practical, repeatable process.
Step 1: Start with a Safe Visual Inspection
Don’t rush onto the roof. Safety first.
Walk around your property and scan for obvious signs:
- Dented gutters and downspouts
- Damaged siding or chipped paint
- Cracked or bruised shingles (visible from edges)
- Broken outdoor fixtures
- Dented AC units
These are your early indicators. They help confirm that your property was impacted and they guide where you should focus next.
Step 2: Take High-Quality Photos and Videos
This is the foundation of how to document hail damage for an insurance claim. Not just photos. Strategic photos.
Capture:
- Wide shots of the entire property
- Mid-range shots of affected sections
- Close-ups of specific damage points
- Videos walking through the damage while explaining what you see
Here’s what separates average documentation from strong documentation:
| Weak Documentation | Strong Documentation |
| One angle per area | Multiple angles per area |
| Blurry or distant images | Clear, focused images |
| No scale reference | Coin/ruler for size comparison |
| No context | Wide + close shots together |
Pro tip: Narrate your video. Speak clearly. Mention the date. Describe what you’re seeing. That context matters later.
Step 3: Capture Hail Size and Storm Evidence
If hailstones are still visible, document them immediately.
Take photos that show:
- Size comparison (coin, ruler, hand)
- Multiple hailstones in one frame
- Impact areas nearby
Why this matters:
| Hail Size | Typical Damage Impact |
| Small (pea-sized) | Cosmetic or minimal |
| Medium (marble-sized) | Surface dents |
| Large (golf ball-sized) | Roof and structural damage |
| Very large | Severe structural risk |
The size of the hail directly affects how your claim is evaluated. But without proof, it’s just a claim not evidence.
Step 4: Build a Written Damage Timeline
Photos show damage. Timelines show credibility.
Write down:
- Exact date and time of the storm
- When you first noticed damage
- What areas were affected
- Any worsening conditions (like leaks appearing later)
Keep entries simple and factual.
For example:
- “June 12, 3:40 PM – Hailstorm begins”
- “June 12, 6:00 PM – Observed gutter dents and roof debris”
- “June 14 – Ceiling stain appeared in living room”
This timeline helps adjusters connect cause and effect.
Step 5: Document Interior Damage Thoroughly
This is where many claims lose strength. Exterior damage shows impact. Interior damage shows consequence.
Check:
- Ceilings for water stains
- Walls for bubbling or peeling paint
- Attic for moisture or insulation damage
- Floors for warping or discoloration
Take photos the same way:
- Wide shot of the room
- Close-up of the damage
- Multiple angles
Interior documentation strengthens your case significantly. It proves that damage isn’t just cosmetic it’s functional.
Step 6: Gather Supporting Evidence
Now you move beyond visuals.
Build your file with:
- Insurance policy documents
- Pre-damage photos of your home
- Weather reports confirming hail in your area
- List of damaged personal property
The goal is simple: remove doubt. The more complete your documentation, the less room there is for dispute.
Step 7: Track Temporary Repairs and Expenses
If you take action to prevent further damage, document it.
Examples:
- Tarp installation
- Emergency roof patching
- Water cleanup services
Save:
- Receipts
- Before-and-after photos
- Contractor notes
These costs are often reimbursable but only if you can prove them.
Step 8: Get a Professional Inspection Before Filing
Here’s where strategy matters.
A trained eye sees what most homeowners miss:
- Subtle impact bruising on shingles
- Granule loss that affects roof lifespan
- Hidden structural issues
You have options:
| Option | Role |
| Contractor | Identifies visible damage |
| Roofer | Provides repair/replacement estimates |
| Public Adjuster | Builds and manages the claim |
Understanding how to document hail damage for an insurance claim includes knowing when to bring in expertise before the claim is locked in.
Roof Damage Types You Should Specifically Document
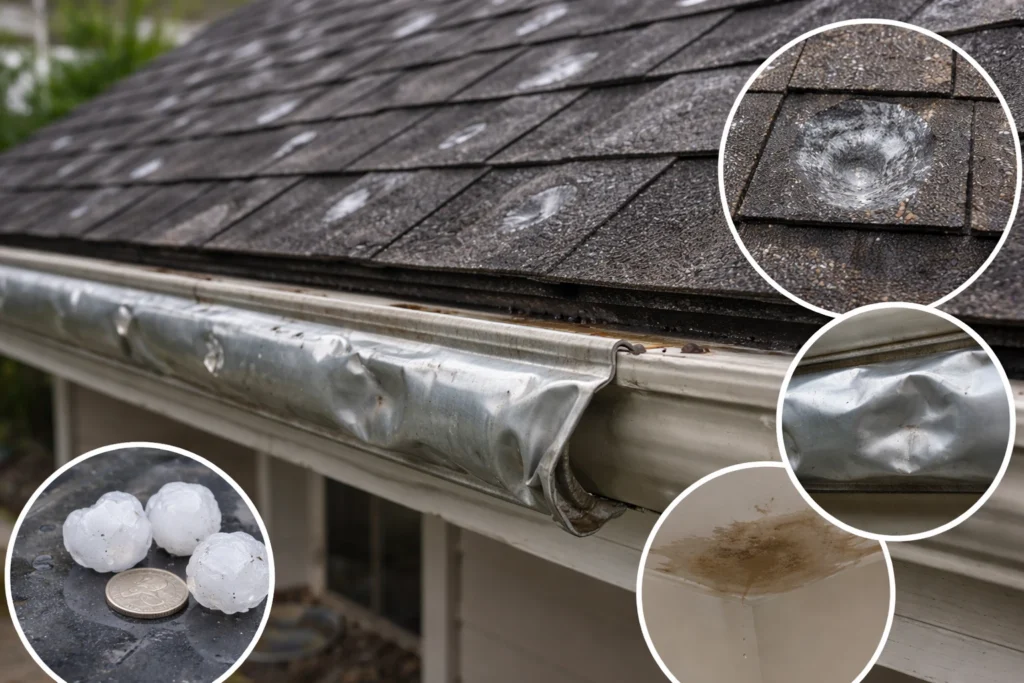
Not all hail damage looks dramatic. Some of the most expensive issues are subtle.
- Granule loss
- Bruising
- Cracks
- Flashing damage
- Gutter dents
Document each individually with clear visuals.
Real-World Scenario: Strong vs Weak Documentation
Homeowner A documents poorly → low payout.
Homeowner B documents thoroughly → full payout.
The difference? Documentation.
Common Mistakes That Hurt Hail Damage Claims
- Waiting too long
- Taking too few photos
- Ignoring interior damage
- Poor organization
Each mistake weakens your claim.
What Insurance Adjusters Actually Look For
They compare:
- Your photos
- Your timeline
- Weather data
They look for consistency and clarity.
From Claim Submission to Payout: What Happens Next
- Submit claim
- Adjuster inspection
- Estimate creation
- Approval or dispute
- Final payout
Your documentation drives each step.
Negotiation Tactics Most Homeowners Don’t Know
- Request reinspections
- Submit additional proof
- Challenge missing items
Documentation gives you leverage.
How to Organize Your Documentation Like a Pro
Use folders:
- Photos
- Timeline
- Receipts
- Reports
Clear organization = faster approvals.
When Documentation Isn’t Enough (And You Need Help)
If your claim feels off, delayed, or undervalued it’s time to consider help.
How Houston Public Adjusting Helps Strengthen Your Claim
In Houston, where hailstorms and severe weather are common, local experience matters more than most homeowners expect. Patterns matter. Materials matter. Claim behavior matters.
A public adjuster can:
- Strengthen your claim
- Identify missed damage
- Negotiate on your behalf
Final Checklist Before Filing Your Claim

- Photos (wide + close)
- Video walkthrough
- Timeline
- Interior damage proof
- Weather reports
- Receipts
Final Thoughts
The outcome of your claim is decided early. It starts with documentation. Learning how to document hail damage for an insurance claim gives you control, clarity, and leverage. Do it right and everything else becomes easier.
FAQs
You should document hail damage as soon as it’s safe, ideally within hours of the storm. Quick documentation helps clearly connect the damage to a specific weather event.
High-quality photos and videos are the most critical elements. They provide visual proof that supports your entire insurance claim.
No, you should avoid climbing onto your roof for safety reasons. Ground-level photos and professional inspections are safer and often sufficient.
You can, but it significantly increases the risk of a low payout or denial. Strong documentation gives your claim credibility and leverage.
Look for dents in gutters, damaged shingles, cracked windows, and signs of interior leaks. Even minor damage can indicate deeper issues.
Yes, interior damage like ceiling stains or water leaks strengthens your claim. It shows that the hail impact caused functional damage, not just cosmetic issues.
Weather reports are not always required, but they can strongly support your claim. They help confirm that hail occurred in your area at a specific time.
Yes, but only after documenting the damage thoroughly. Always keep receipts and take before-and-after photos of any repairs.
Incomplete documentation can lead to delays, disputes, or reduced payouts. Insurance companies may question or overlook damages without clear evidence.
You should consider hiring one if your claim is undervalued, delayed, or confusing. A public adjuster can help strengthen your documentation and negotiate on your behalf.